
Technical resource 14 min read Updated
Outdoor Cinema Setup — Screen, Projector and Audio
Where everything goes and what plugs into what — screen placement, front vs rear projection, throw distance, the projector table, speaker positions, balanced audio, power and the troubleshooting table we use on site.
A good outdoor screening is mostly geometry and signal. Get the screen in the right place, the projector at the right distance, the speakers either side and the audio balanced, and the evening runs itself. Get any of those wrong and no amount of expensive equipment saves it.
This is the layout and wiring procedure, in the order you’d actually do it on site. The screen itself is covered in inflatable screen setup; the sizing tables are in screen size and viewing distance.
Start with the audience, then place the screen
Stand where the back row will be before you decide anything.
- Sightlines first. Flat ground means people see over the heads in front only if the screen base is high enough. A gentle natural slope is worth walking an extra hundred metres for.
- Front row distance. Too close and the front row spends the film looking up. As a working rule the first row sits no closer than about 1× the screen width, and the last row no further than about 6×.
- Face away from the setting sun. A screen pointing west is unwatchable at twilight, which is exactly when most community events start. Check where the sun sets on the actual date.
- Find the ambient light. Car parks, streetlights, sports floodlights, the pub’s signage, the toilet block. Anything shining onto the surface washes the picture out, and a light you didn’t notice at 4 pm is very obvious at 8 pm.
- Wind direction sets the screen orientation as much as anything else — see anchoring.
- Think about the walk-in. Where do people arrive, where does the queue form, where do the food trucks go, and does any of that cross your cable run?
Front or rear projection
Decide this early, because it determines the entire layout.
Rear projection puts the projector, cables, media and crew behind the screen. That means no trip hazards through the audience, nobody walking through the beam and casting a shadow, no projector island to fence off, and more usable seating area in front. For council and school events, where crowd management is half the job, it is often the safer arrangement. It requires a rear-capable screen surface, room behind the screen, and the image flipped or mirrored in the projector menu.
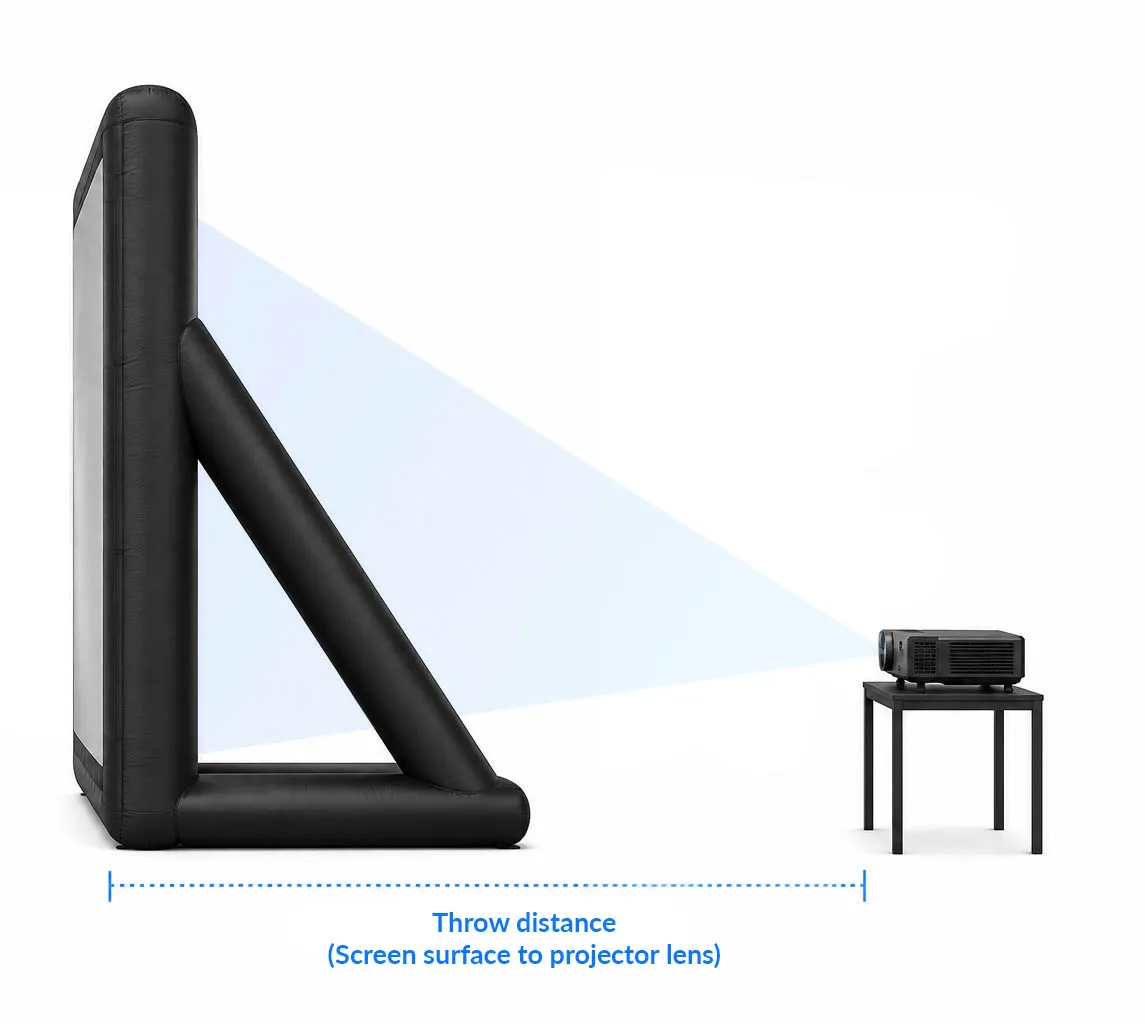
Front projection is simpler, works with any screen surface, and is what most people already own. The cost is that the projector sits in the middle of your audience — so it needs a table, a barrier, a cable run through the crowd, and someone keeping people out of the beam.
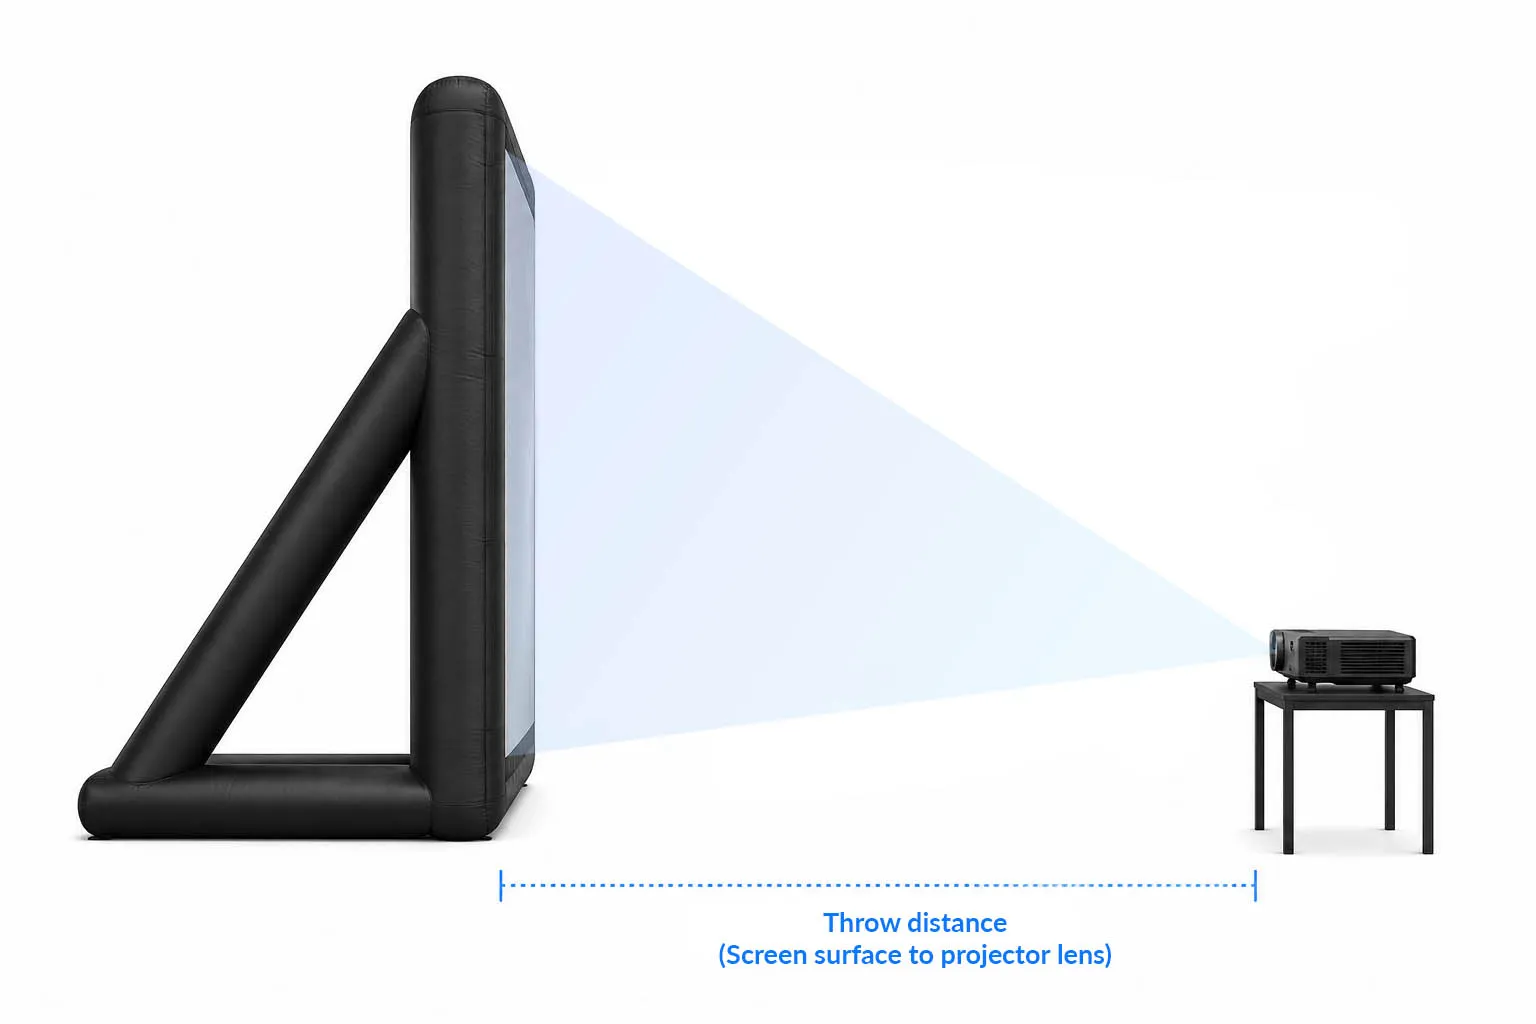
One thing to watch with rear projection: avoid placing the projector where the audience looks straight into the lens axis through the screen, or they will see a bright hot spot in the middle of the picture.
Throw distance: work it out before you leave
Throw distance is measured from the screen surface to the projector lens — not to the frame, which on an inflatable can be half a metre out.
The formula
Throw distance = throw ratio × screen surface width. A 1.5:1 projector on a 4 m wide surface needs 6 m. Projectors with a zoom give a range rather than a single number.
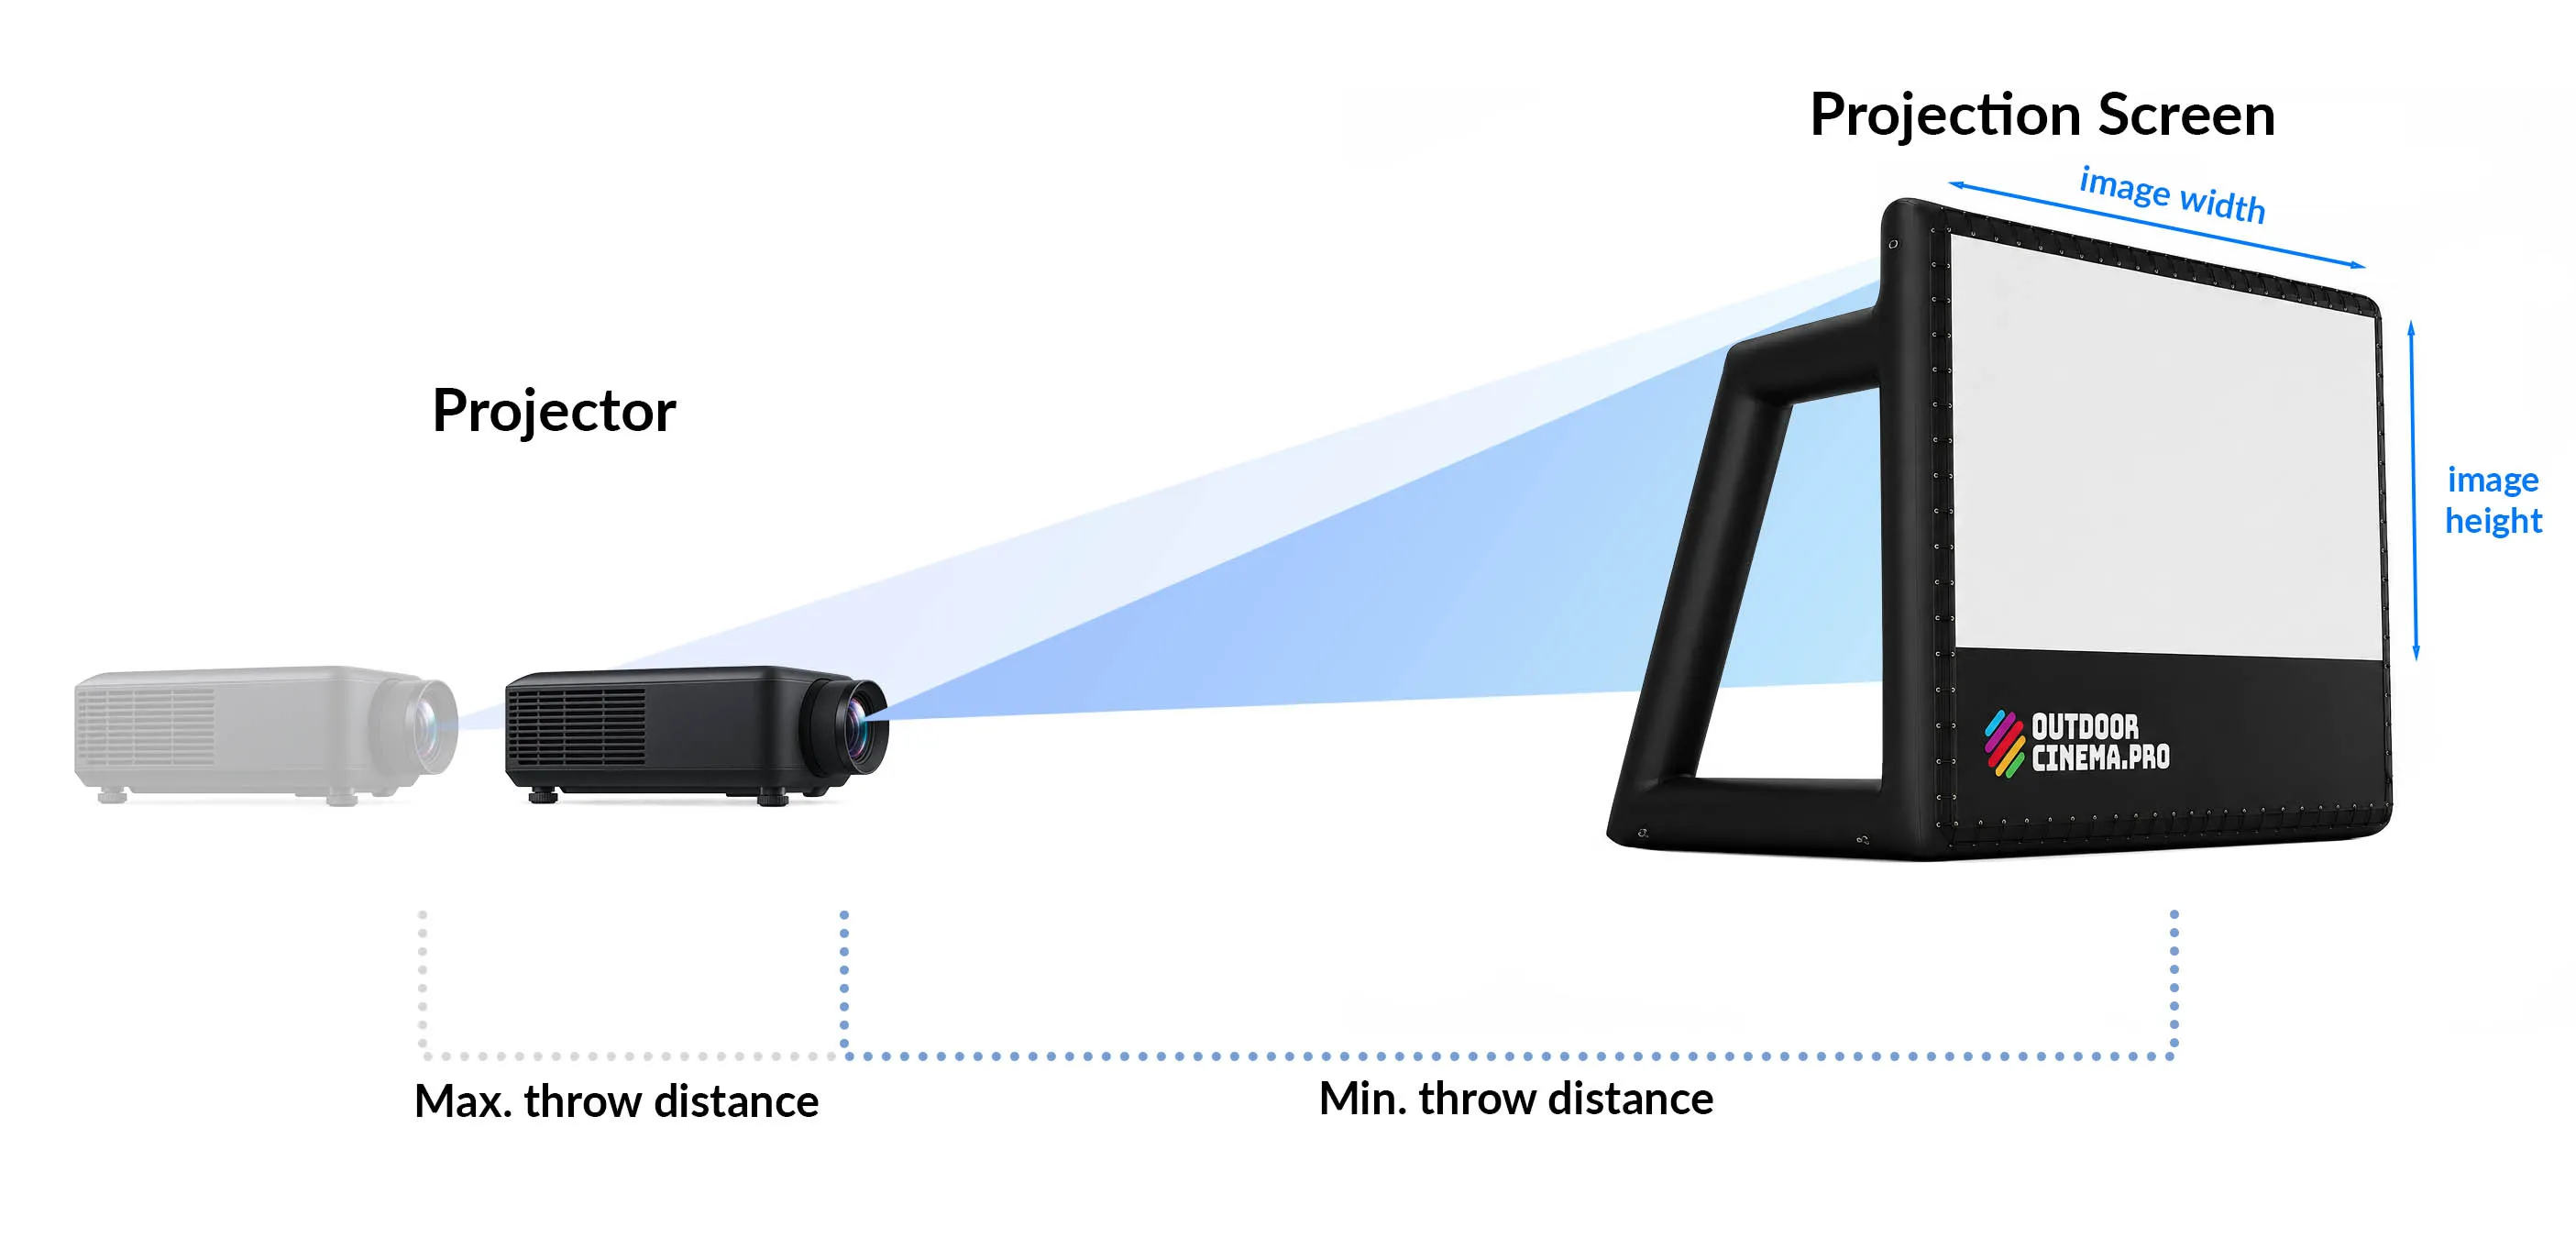
A real example from one of our packages: the Optoma EH412 has a throw ratio of 1.12–1.47:1, so on a 3 m screen it wants 3.36 m to 4.41 m. Place the projector inside that band and then use the zoom to fill the screen exactly — rather than parking it at one extreme of the range and hoping.
Tight sites. A short-throw projector cuts the distance dramatically: a 6 m screen can need 12–15 m with a standard lens but as little as ~3 m with short throw. Two warnings, though. Do not use ultra-short-throw projectors on inflatable screens — the surface is never perfectly flat and the geometry distorts badly. And the shorter the throw, the more any screen movement in wind is magnified on the picture.
Height. Set the lens close to the height of the bottom of the intended image. Lens shift and keystone correction are there to fix the last bit, not to rescue a projector that is in the wrong place — keystone in particular costs you resolution and sharpness.
Full sizing tables are in screen size and viewing distance.
The projector table
For anything beyond a backyard setup, use a table, not a projector stand. The projector is never the only thing that needs a home: the laptop or media player, the DI box, an HDMI switcher if you have multiple sources, the remote, a torch, and enough surface to coil cable so nothing is pulling on a connector.
- Height at roughly the bottom of the image, as above.
- Stable and weighted. A trestle on soft grass will move. Weight it, and keep drinks off it.
- Strain relief. Tape or clip the HDMI and power leads to the table leg. Most mid-show failures are a cable pulled at a connector, not a device fault.
- Have a cover. A shower that the screen shrugs off will end a projector. Keep a plastic tub or cover within reach the whole night.
- Sight line to the screen so whoever’s operating can actually see what the audience sees.
Speaker placement
Outdoors there are no walls to reflect sound back, so level falls away fast: every doubling of distance costs about 6 dB. That is why one pair of speakers covers a backyard but not an oval.
- One speaker each side of the screen, at ear level, angled in towards the audience. That covers the majority of events and keeps the setup simple.
- Never behind the audience. Sound travels at about 343 m/s — roughly 3 ms per metre — so a rear speaker arrives noticeably late and reads as an echo on dialogue.
- For deep audiences, add fill or delay towers around the middle of the crowd, not the back, and time-align them: a tower 30 m behind the mains needs about 90 ms of delay so its sound arrives in step.
- Size to the crowd. 8” tops for small audiences; 12–15” for large ones. A subwoofer adds the cinematic low end that small tops physically cannot produce.
- Give yourself headroom. Choose a system whose max SPL clears your target listening level by about 10 dB, so peaks stay clean instead of clipping.
- Keep them out of the beam and out of the walkway.
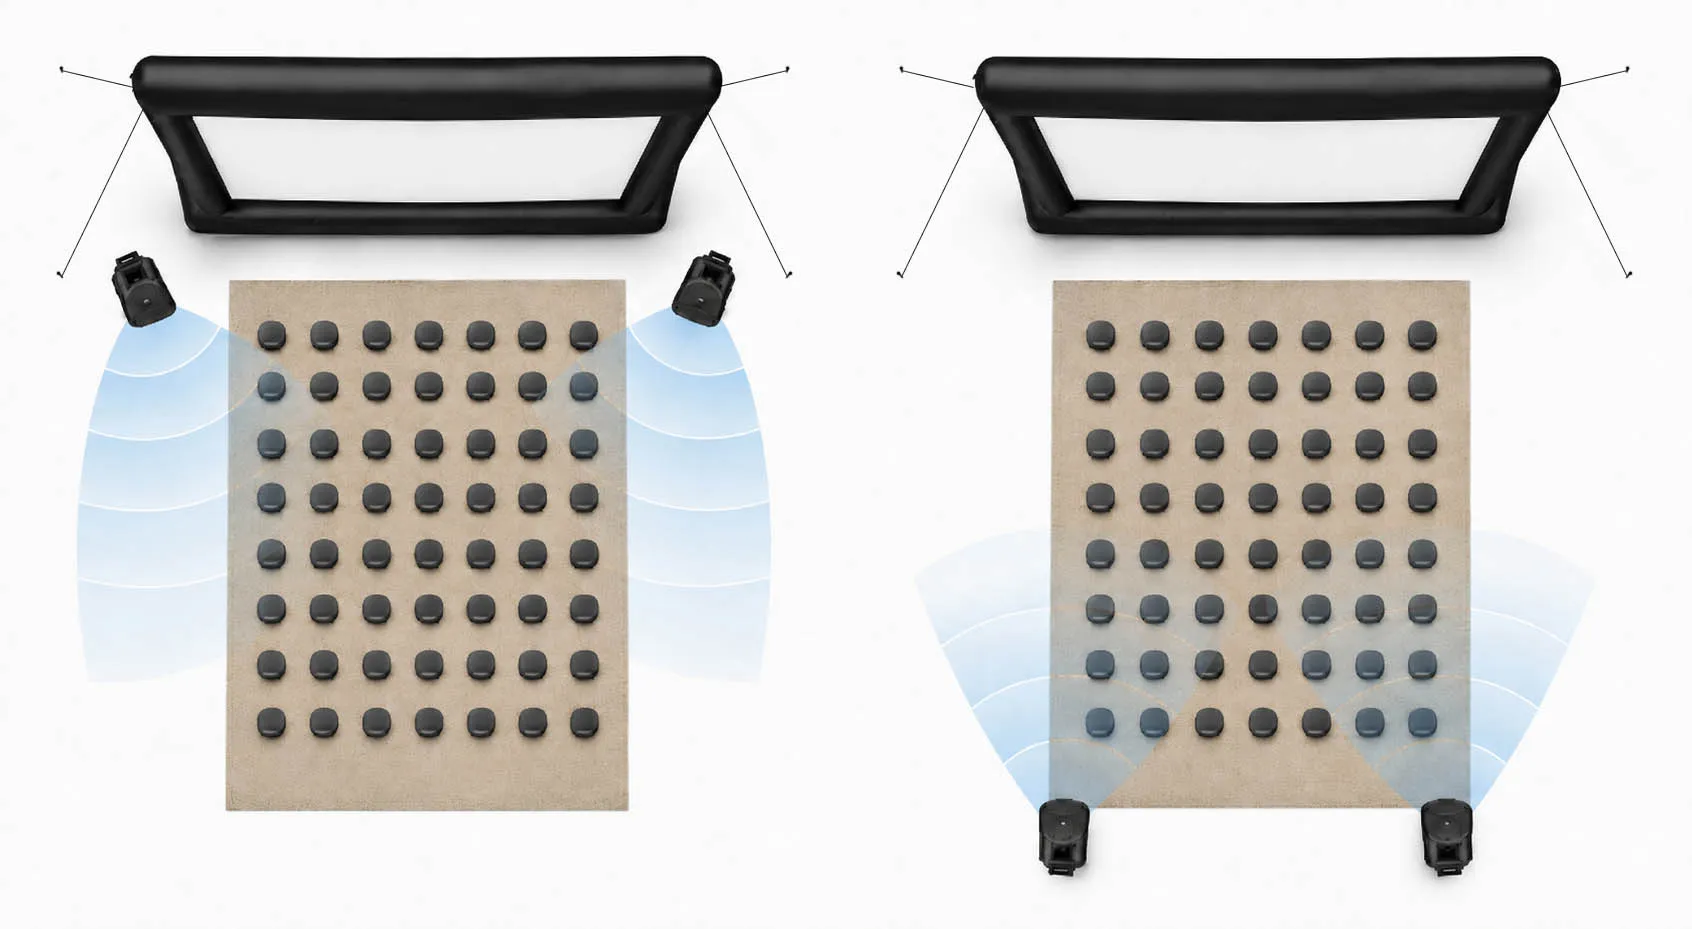
Left — speakers either side of the screen, angled in: even coverage, sound and picture arrive together. Right — speakers behind the audience: the sound arrives late and reads as an echo against the picture.
Signal: what plugs into what
Video. HDMI from the media source to the projector. HDMI is reliable to about 10 m on a good cable; beyond that use an active cable or an extender rather than chaining adapters. Newer laptops may need USB-C to HDMI.
Audio. You have two sources to choose from:
- From the media source — the laptop or player’s own output into your speakers.
- From the projector — the HDMI cable carries audio as well as video, so the projector’s 3.5 mm output can feed the speakers instead. Some laptops need the HDMI device selected as the audio output before this works at all.
Whichever you use, the important distinction is balanced vs unbalanced:
- Unbalanced (RCA, 3.5 mm headphone) picks up hum and interference the longer it runs.
- Balanced (XLR, TRS) rejects that noise and will run tens of metres cleanly.
A DI box converts one to the other: feed it 3.5 mm or USB from the laptop, take balanced XLR out to each speaker. Our Pro packages ship with one for exactly this reason.
Setting the speakers correctly matters as much as the cable. Connect the DI box outputs to the line inputs (CH1) of each speaker — not mic — and set the line input level the same on both, or the image will pull to one side.
Cable rule
Never run unbalanced audio alongside power leads. If they must cross, cross them at right angles rather than running them parallel for metres.
Cables, power and safety
- Route behind the screen wherever the layout allows — this is one of rear projection’s quiet advantages.
- Mat or gaffer every crossing of a walkway, and remember the audience leaves in the dark.
- Label both ends of every run. At pack-down, in the dark, you will be grateful.
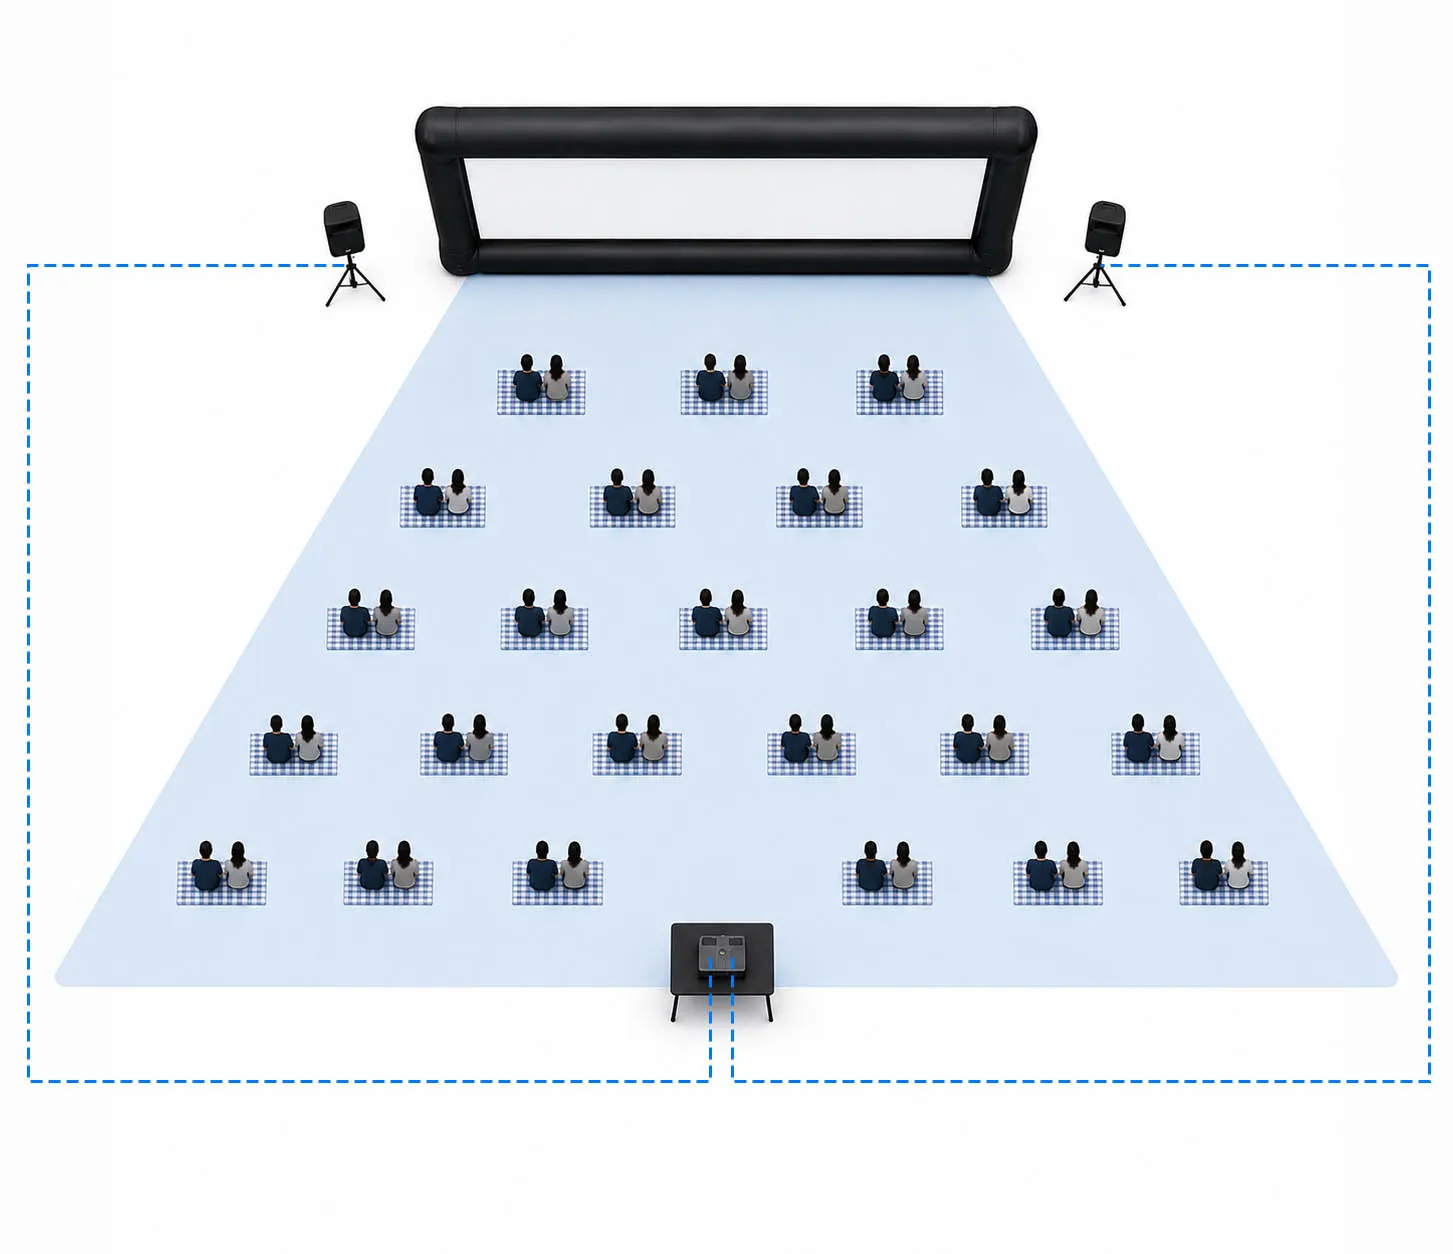
Front projection: the projector sits behind the back row and the cable run goes around the audience, never through it.
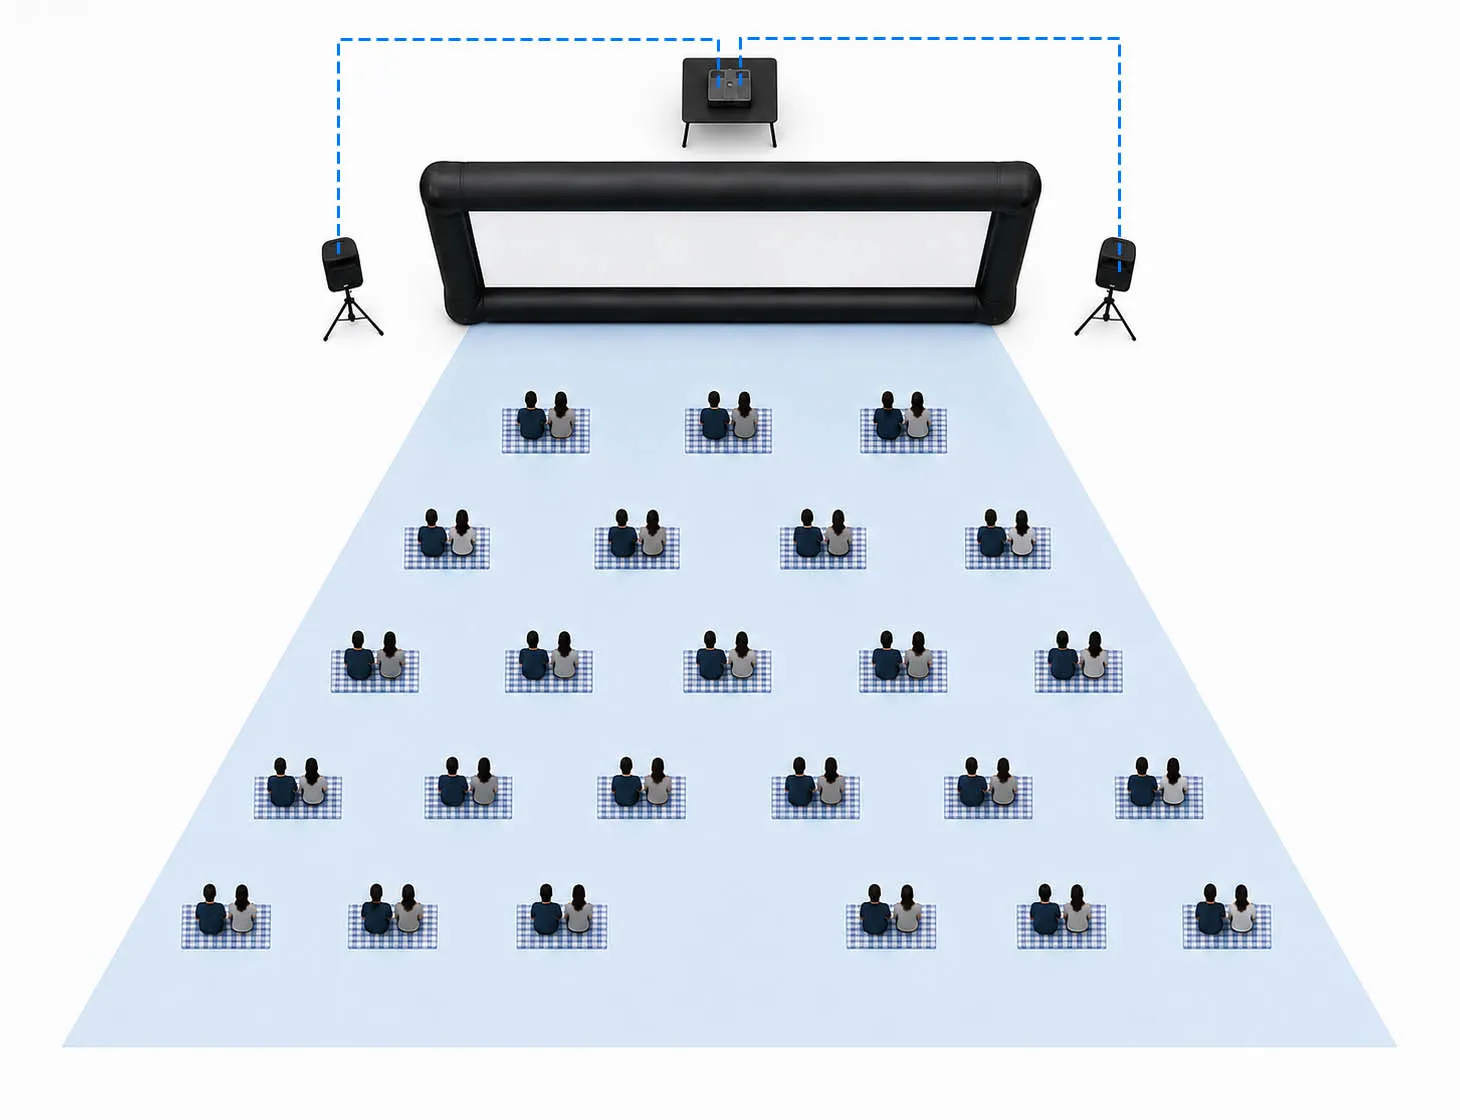
Rear projection: projector, cables and crew all live behind the screen — no cables cross the audience at all.
- Power budget. Add up the projector, the powered speakers and — if you are running a constant-air screen — the blower. A commercial blower is a real load — 1.3–2.1 kW depending on the model; don’t put it on the same circuit as the AV.
- Generators go well away from the audience for noise and exhaust, and a cheap generator can inject hum into audio — a pure sine-wave unit is worth the difference.
- RCD protection, correctly rated leads, and test-and-tag if you are working for councils or schools, who will ask.
- Spares. Carry a spare HDMI, a spare 3.5 mm and a spare XLR. Discovering you have forgotten a $20 cable can end an entire event.
Setting levels — and the multi-volume trap
There are usually four or more volume controls between the film and the audience, and the most common “the sound is too quiet” fault is three of them sitting at 30%.
Set the gain structure from the source forward: get a healthy signal out of each device before reaching for the next master. The chain typically runs:
Media source → projector or DI box → speaker line input → speaker master
Bring each up in turn, start low, and check them all before deciding something is broken. Watch for clipping on the meters, and keep monitoring through the night — as the crowd builds, the ambient noise floor rises with it.
Troubleshooting
| Symptom | What to check |
|---|---|
| No audio at all | If you’re using a laptop, confirm the audio output device — with HDMI it must be the projector, not the internal speakers. Then check every volume in the chain isn’t at minimum. |
| Audio very low | Multiple volume controls set low. Work through: speaker line input, speaker master, projector volume (if taking audio from the projector), source volume. |
| Audio from the projector’s own speaker | Mute the projector on its remote — it is playing the soundtrack through its internal speaker as well as passing it on. |
| Hum or buzz | Ground loop. Switch the DI box from GND to LIFT. If it persists, try the Pin 1 isolation switch, and separate audio from power cabling. |
| Poor audio quality over distance | Unbalanced cable running too far. Use a DI box or mixer to get to balanced XLR before the long run. |
| Picture is skewed or soft at the edges | Too much keystone correction. Move the projector rather than correcting further. |
| Picture won’t fill the screen | Projector outside its throw range — move it, then zoom. |
| Image is backwards | Rear projection without flipping the image; change it in the projector menu. |
Special cases
- Drive-in. A low-power FM transmitter broadcasts the soundtrack to car radios: every vehicle sets its own volume and the site stays quiet at the boundary.
- Near housing, or under a noise curfew. Wireless headphones give you a silent-cinema setup that no curfew can object to.
- Remote sites. Keep the content offline rather than relying on a data connection, and use a pure sine-wave generator.
- Multiple sources (a welcome video, then the film; a camera feed at a sports screening) need an HDMI switcher, and ideally a small mixer for audio. Ask us about a custom media box that puts the lot in one case.
Test before show day
Never use new equipment for the first time at an event. Run the whole chain — source, projector, speakers, at show volume, with real content — at least a day before, and again at the start of each season when the gear comes out of storage.
Then on site, before doors: play something at show level, watch it from the back row and from the front corner, walk every cable run, and check the remotes have batteries.
Planning something larger? Talk to us about audio systems, media control and coordinating with a venue’s existing PA.
Common questions
How far should the projector be from an outdoor movie screen?
Multiply the projector's throw ratio by the width of the screen surface. A 1.5:1 projector on a 4 m wide surface needs 6 m from the surface to the lens. Measure to the surface, not the frame, and place the projector within the zoom range rather than at one extreme.
Should I use front or rear projection outdoors?
Rear projection puts the projector, cables and crew behind the screen, which removes trip hazards from the audience area, stops people walking through the beam and frees up seating space. It needs a rear-capable screen surface, the image mirrored in the projector menu, and room behind the screen. Front projection is simpler and works with any surface, but you have to fence off a projector island in the middle of the crowd.
Where should speakers go at an outdoor cinema?
One either side of the screen, at ear level, angled in towards the audience. Never behind the audience — sound travels about 343 m/s, so a rear speaker arrives late and reads as an echo. For very deep audiences use delay towers around the middle of the crowd, time-aligned at roughly 3 ms per metre of distance.
Why is there no sound from my projector setup?
Most often the laptop is still sending audio to its own speakers rather than over HDMI — check the output device. After that, work through every volume control in the chain: source, projector or DI box, speaker line input and speaker master. If the speakers are on a mic input rather than line, the level will be wrong too.
How do I get rid of a hum in the audio?
A hum is usually a ground loop. Switch the DI box from GND to LIFT. If it persists, try the Pin 1 isolation switch, keep unbalanced audio cables away from power leads, and avoid running audio and power in the same bundle over long distances.
Planning an outdoor screen or LED installation?
Tell us about your site and audience. We scope, supply and support outdoor cinema and permanent LED systems Australia-wide.